Jitsu generates standard XHTML web pages, which can of course be styled with CSS and scripted with JavaScript. Here is an example that includes both. Click on each of the bottom buttons to see it affect the element above.
In Jitsu, the <head> section can include inline stylesheets or linked stylesheets.
Each Jitsu <j:App> tag may include a single <script> tag to define methods for the application.
Using styles
On this page, we define a stylesheet with two rules:
    <style>
        .c1 { color: red; font-size: x-large; }
        .c2 { color: purple; font-family: arial;  }
    </style>
In the body of the page we attach style to controls and elements using the HTML class and style attributes:
    <j:Button class="c1" text="Red Lorry"/>

    <span class="c1" j:makeControl="true">Some text</span>

    <j:Button class="c1" style="color: blue;" text="Blue Lorry"/>
Jitsu controls support the standard class and style HTML attributes - you can specify a class or style on any control. The first button in this example picks up the "c1" class. After this there is a span using also using "c1". Finally, there is another button using "c1", with an on-control style property to make the button blue.
The j:makeControl="true" attribute on the <span> tells Jitsu to turn the span into a control - that way we can address it through script. We explain this attribute in more detail at the end of this page.
CSS Stylesheet Guidelines
Jitsu controls have tremendous flexibility in shaping and modifying the HTML elements that appear on a page.
For example, consider Buttons. Buttons have three forms:
| Source Markup | Rendered HTML |
<j:Button text="Hello"/> |
<input type="button" value="Hello"/> |
<j:Button text="Hello" isLink="true"/> |
<a>Hello</a> |
<j:Button>
    <img src="hello_image.gif"/>
</j:Button>
|
<button>
    <img src="hello_image.gif"/>
</button>
|
From an application perspective, all three usages serve an identical role - they provide a region the user clicks on to invoke a command. However, each variant generates different HTML.
That can cause trouble in CSS stylesheets, since stylesheet selector rules often explitly refer to specific HTML element names - if you modify a source document to generate a different HTML element structure, the CSS rules break.
For that reason, we recommend using CSS class-based styles over the other CSS selector mechanisms available. Avoid using CSS selector rules like:
    /* avoid this - creates a fixed dependency */
    input[type="button"] { font: red; }
This creates a dependency on a Button being rendered as an <input type="button>. Instead of this, we suggest using CSS style classes, e.g.
    /* class selector - works even if you change which control you use */
    .red_button { font: red; }
and then creating a button that explicitly refers to the class:
<j:Button class="red_button".../>
When you find yourself duplicating the same markup a lot of times, consider using a markup control , which lets you create a piece of markup and "can" it so it can easily be shared and reused.
Dynamically changing classes and styles
The example code on this page has a script and three buttons which use the script to dynamically alter styles on the styled buttons. Let's look at these.
The setIt() method
The script at the top of the page defines a setIt method. This is just a short method to make it easy to set properties on controls:
    #method setIt(index, property, value) {
        var child = this.getChild(index);
        child.setValue(property, value);
    }
This script uses "#method" to add a new method to the application. #method is a Jitsu shortcut to make it easier to add methods to classes. Inside an <j:App> script, you can use #method to add new methods to the App. Inside the method, "this" refers to the Jitsu app on the page.
setIt calls getChild() on this AppControl to get the control at the specified index - 0 is the "Red Lorry" button, 2 is the "Blue Lorry" button, etc. Finally, it calls setValue to set the resulting control, to set the value of a property on that control.There are next three buttons on the page that use setIt:
Setting styles
The first button dynamically sets the fontStyle of a control to 'italic':
    <j:Button
        click="this.setIt(0, '$fontStyle', 'italic');"
        text="child 1: italic"/>
The click handler is sets the "$fontStyle" property of the zero-th control on the page (the "Red Lorry" control) to "italic".
Why the "$"? When Jitsu's setValue sees a "$" prefix at start of a property name, it knows that the property being set belongs an HTML stylesheet - it digs under the hood, gets the control's HTML peer element, gets its stylesheet, and sets the property on the stylesheet. The page is updated immediately.
To do the same work in a DOM-based web application, you'd use something like:
    var elem = document.getElementById("btn");

    if (elem.style.setAttribute) {
        elem.style.setAttribute("fontStyle", "italic");
    } else {
        elem.style.fontStyle = "italic";
    }
Jitsu hides this difference between browsers.
.Setting class
The next example sets the class of the span to use c2:
    <j:Button
        click="this.setIt(1, '@class', 'c2');"
        text="child 1: use class 'c2'"/>
The click handler here calls the setIt method to set the "@class" property of the second control to "c2".
When Jitsu sees an "@" at the start of a property name, it knows that the property being set is an HTML attribute - it digs under the hood, gets the HTML peer element associated with the control, and sets the attribute on that peer. The page is updated immediately.
To do the same work in a DOM-based web application, you'd write something along the lines of:
    var elem = document.getElementById("btn1");

    if (isIE) {
        elem.setAttribute("className", "c2");
    } else {
        elem.setAttribute("class", "c2");
    }
Again, Jitsu handles this difference between browsers - "@class" always works in Jitsu.
.Setting a Jitsu property
The third example sets the ID_text property of the Blue Lorry button to say "Blah Lorry":
    <j:Button
        click="this.setIt(2, ID_text, 'Blah Lorry');"
        text="child 2: say 'Blah'"/>
The click handler here calls setIt to set the third child's ID_text property to the string 'Blah Lorry'. All Jitsu-specific properties have ID names. These IDs are managed by the IdManager class.
When you set a Jitsu property on a control, it updates the HTML on the screen.
To do the same work in a DOM-based web application, you'd write something along the lines of:
    var elem = document.getElementById("btn1");
    elem.value = "Blah Lorry";
More on peers
To understand what is going on, consider this diagram:
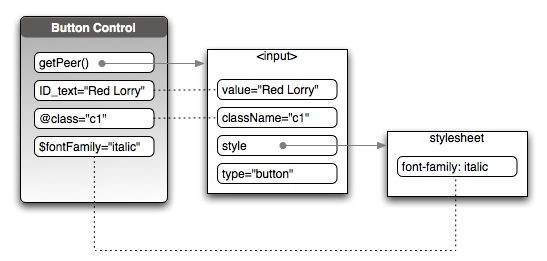
Every control on the page has a peer - a pointer to an HTML element in the DOM that the user sees. For button controls, the peer is usually an <input type="button"> element.
Every control in Jitsu also maintains three collections of properties:
- Jitsu properties - identified in JavaScript by variable names starting with ID_ (e.g. ID_tagName, ID_text). These are properties which are not known to the HTML DOM. Controls may map selected Jitsu properties to lower-level HTML attributes, e.g. ID_text is linked to the "value" attribute in the diagram above.
- Attribute properties - identified using strings starting with "@". These are linked directly to attributes in the DOM, with the same name minus the "@" (one exception being "@class", which is mapped to either "className" or "class" depending on the browser).
- Style properties - identified using strings starting with "$". These are linked to style attributes on a DOM element's stylesheet - note that we use JavaScript conventions for the names for the attributes, replacing hyphens with capital letters.
One way to remember this is to think of "@" as standing for "@ttribute" and "$" as standing for "$tyle".
You get and set all three kinds of properties using control.setValue() and control.getValue() - meaning that all three kinds of properties are available for databinding.
When controls render, they output their Jitsu properties using the appropriate HTML attribute - the ID_text property of a button becomes the "value" attribute of an input element, for example.
In addition, when you set "@" properties on the control, they are set as attributes on the peer element, and when you set "$" properties on the control, they set on the peer element's stylesheet.
Turning HTML into controls
The markup on this page illustrates an important point about the Jitsu page compiler. Look at the span at the start of the page:
<span class="c2" j:makeControl="true">Some text</span>
The j:makeControl="true" statement tells Jitsu to generate a control for this span, so that you can modify it dynamically using the Jitsu API.
By default, the Jitsu page compiler treats HTML that occurs in a template as static. It does not generate controls in the control hierarchy corresponding to every HTML element you place in the source document. This is primarily for efficiency - the page compiler turns the majority of the HTML in a source document into literal strings, which are injected into the final rendered page as-is, making page rendering much faster. However, since much of the HTML is stored as literal strings, you can't use the Jitsu API (getValue/setValue, databinding, animation etc) on most HTML elements.
If you want a piece of HTML to behave dynamically, you must tell the Jitsu page compiler to make an ElementControl for the element. An ElementControl is a control in the control hierarchy which outputs a single HTML element on the page.
Any of the following cause the page compiler to to generate an ElementControl for an element in a source document:
- Give the element an id attribute
- Give the element databindings
- Add an "expando" property to the element
- Add controls as children to the element
In this example, we are attaching an expando property j:makeControl to the element to force it to become a control..
An "expando" property is a property that can be attached to any element or control in a source template, regardless of the element type. Jitsu defines several expandos in the Jitsu namespace, hence the use of the "j:" namespace prefix.
The "j:makeControl" expando serves only one purpose - to force the page compiler to generate an ElementControl for the HTML. You'll see other expandos in the course of the quicktours.